Monday, November 25, 2013

Details and options

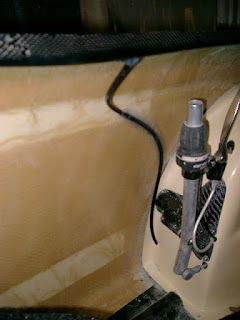
I have finally come up with a way to hold wires to the shell that is simple, easy to do, and very light.  The secret is in the one layer of carbon fiber used to make the fixture.  The other trick is sticking the tube to the shell with silicone.  The advantage of using silicone is that you can remove  it if necessary and we always have a few tubes of it in the shop.  The disadvantage is that it takes at least overnight to set enough to stay in place.   Here's a picture of it in the 1/4" diameter


Now I just have to finish the wiring in my velo so it is rideable any time.  It is still missing the connections for the headlights and brake light with only the signal/running lights working. 

Plastic drain for the rain gutter.  The piece of tubing used as a drain for the rain gutter is now easily made.  I just had to make some jigs to form the end of the tube rather than doing it free hand.  I'll use the channel for the wires to hold it to the side of the velo.


Mirror fairing with the light in the front of it seems to be working out nicely.  I had to come up with a slightly different clip to mount the mirror.  The mirror mounts so it is almost touching the shell rather than on a stalk. I suspect that it will now be possible to mount it on most velos. 


The Milan GT and Milan SL both come with suspension on all three wheels.  I do have the plug for making the rear fender for the SL without rear suspension in the shop.  I will move it out into storage where it can rest until some one really wants this version.  I will take some convincing to do so!!!!  The front suspension is the normal strut from Velomobiel.nl but with the stiffer spring in it.  The rear suspension is a double sided swing arm with two suspension struts, one on each side. 

Tuesday, November 5, 2013

Last Weekends Ride

On the spur of the moment I decided to go for a ride on the flatter island, Vancouver Island.  It was just about 1/2 an hour before the ferry left the island when I decided.  By the time I pumped up the tires found my repair kit and got going I had only 20 minutes left.  Just a little ways down the road I realized I forgot to take my battery from the charger.  By the time I turned around and got the battery I thought I won't make the ferry.  If I made the ferry I would ride on the other side if not just ride on the island.  I pushed pretty hard and had just enough time to make the ferry to get off the island.  This has to be my fastest trip ever to the ferry.  Maybe the reason is the small visor I made to try out.
As it turns out I didn't have it quite right as I still got a bit chilled going down hills at speed.  The back edge needs to be about an inch higher to deflect the onrushing air onto my helmet rather than my forehead.  The good part is that after coming off the first hill I was able to hold over 50 kph for quite a while.  This is about 2-3 kph more than before along this section.   I had the unusual situation of traffic not passing me as I was close to the speed limit.  Needless to say this didn't last.  It ended up being an excellent ride with the fastest two hour average ever at just over 35 kph.   I am lucky to get around a 25 kph average on Quadra Island.  It must have something to do with hills!!!

Friday, October 18, 2013

Ribs

No, this isn't about the kind you can eat.  In the photo below you can see the stiffening rib installed in the side of the Milan. 
 
This adds much needed stiffness to the long flat side of the Milan.  While the panel was strong enough without the rib it seemed to act like a sounding board for vibrations from the road.  To further reduce this I have rebuilt the rear fender.  Here you can see the first half.
 
What different about this one is that it considerably stiffer by the addition of an extra layer.  The extra layer is the material Bio-Mid which is made from sawdust from western Canada.  The material looks much like regular fiberglass but has a density similar to Kevlar.  It adds thickness to the laminate without a lot of weight.  Having this layer between two layers of carbon optimizes the carbon's properties.  


Monday, October 7, 2013

On the Road at Last

This is the first picture taken of the blue Milan GT on the road.  It is still missing a few bits but ride able.  The first thing I noticed that's different about it is the weight.  It looks like the Milan GT in carbon/Kevlar laminate will finish out in the low 60 pound range.  While I was hoping for under 60 with some more development this may still be possible.  The second thing I noticed is that it is noisier than the glass version.  Right now I am working at reducing the noise and think I may have it in hand.  My local short test loop has some very poorly surfaced roads so if I can make it acceptable on these it won't be a problem elsewhere.  The problem may be with a high tech thin laminate without excess resin in it transmits vibrations more.  Having a high resin content makes for thicker laminate and the resin itself is less prone to transmitting noise or vibration than the carbon or Kevlar material.  Some localized stiffening seems to help a lot.   Tomorrow morning ride will tell if it good enough. 

 
The first seat that I have infused.  It does have a couple of foam ribs on the back making infusion an easier overall process than our usual method with vacuum.  The disadvantage is than we end up using a bit more resin and have more materials that need to be throw any.  The big plus is the potential weight saving.  While this seat is a bit light for my liking I will test it some to see how it stands up.  The weight I would be happy with is under 500g.  This one weighs in at 414g without the holes in it but I would like to add a bit more carbon in a couple of spots.

Sunday, September 8, 2013

Weight Wennie Seat

 
In the shipment with the SL plug Raderwerk sent their latest light weight seat.  I weighs in at a "heavy" 399 g.  Not yet sure if I am  comfortable going this light but it is an impressive bit of composite laminating.  To put this in perspective the Ventist seat pad is lots heavier. 
 
 
The Ventist seat weighs in at 476 grams.  This is the thin version of the pad.  The comfort one will be about 1/3 more.  

 
In the SL I will have to ditch the pad as it takes up too much space, it move me forward a couple of cm.  Given the choice between fitting and the pad I'll take the fit and deal with the comfort issue with some padding only where required.  More work but less weight.  

Thursday, September 5, 2013

Fitting into the SL

Since receiving the pattern for the Milan SL this spring I have wondered if I can ride it.  Do I fit into the SL?  I am about 6'2" but have short legs.  I understood that I may just be a little too tall.   The hope was that my short legs would let me fit.  Well I now know what the answer is. 

We just got Milan SL sitting on its wheels last night.  When I first sat in the SL things were not looking too good.  I had the bottom bracket adjusted a bit too far forward and couldn't spin the pedals as my shoes contacted the sides.  The crank size is 152.  Moved the BB back a touch and couldn't pedal without my shins contacting the front of the door opening.  Next tried moving the seat back from its normal position.  Closer but still could not pedal properly.  Moved the seat back even further so there was almost no space between the seat and the rear fender.  Now it is possible to pedal if you are very exact about how you do it.  This is probably still too tight a fit for me to ride for very long.  Removed the seat pad and made sure I was fully back in the seat and I can now imagine riding this way.  Some careful padding of the seat will be required to get a comfortable enough fit. Still need to check to be sure once the SL is able to be ridden.   It may also require a modification to the door so there is slightly more room for my knees.  Moving the point where the seat mounts at the front end may end up raising it slightly as the floor is dished a bit to get the seat as low as possible.   Another issue may be if there is enough room for the rear idler. While it is looking encouraging to fit, it is not yet a sure thing.  At least it may be possible rather than not!

Monday, September 2, 2013

Progress

The first GT (green) with two other GTs in carbon/Kevlar laminate.  The little black thing in the middle is the first SL.  All three of the ones in progress should be done this month. 

Friday, August 30, 2013

Another longer ride and observations

A few days ago I took the Milan for a longer ride on Vancouver Island from Campbell river to Comox.  When I left the house, I had the hood on but ended up removing it on the ferry and putting it in Jan's car.  The reason for taking it off were twofold:  first, it was annoying me having it on and it wasn't raining much nor was it supposed to (forecast said only a couple of hours for less than a mm).  I figured this should be OK as it was warm enough and all that could happen was my getting wet.  The second reason was I was riding with a friend to whom I had lent my Borealis.  He didn't have a roof so why should I!!  I met him along the road and off we went.  Well it went from just a few sprinkles to a downpour an hour later.  Just as we got rolling along a slightly downhill section, that goes on for about 15 km, I got a flat.  Changed out the tube and on we went.  I did get a bit chilly doing this but warmed up once we had to climb some hills heading to lunch at a pub. 

 Before the flat I had given up leaving my glasses on as it was just raining too much.  The rain also slowed progress quite a bit.  I am sure on a sunny day I would have ridden this section at 40+ kph just dancing lightly on the pedals--just a perfect section for a velo.   Will need to ride here again. 

The conclusion drawn from this ride was that there is a need for a easily deployable roof that stores inside the velo.  What I am thinking of is a tensioned fabric structure with some batons in it that can be put on in a minute or less without getting out of the velo.  If it works out it would also work nicely as a sunshade.   The Flevobike roof would do this but I would prefer the roof to be wider and to pack smaller.

Friday, August 9, 2013

Second roll out test

Managed to find a spot that was suitable for a roll out test.  It is a few km away but one of the better smooth stretches of pavement on the island.  A pull out on one side the of road for turning around  and a T intersection an couple hundred meters from the test section to turn around and come back.   Only issue is the road has a slight curve in it but that didn't seem to matter.  The test section I used was about 100 meters long with a slight downhill to start then a tiny bit of flat and then gradually uphill.  I would reach 12-13 kph coasting down then roll to a stop.  Testing equipment consisted of three sticks about a half meter long.  At the top of the hill I laid one of these sticks in the bushes on the side of the road.  To start the test I would line up so I could sight along the stick and then release the brake.  The second stick was  used to mark how far I rolled out.  The third stick was to mark any variation from the first roll out.  I did three roll outs with the setting I arrived with.  All were within about a half meter.  I reset the toe in by one turn and did it again.  The difference was a half a velomobile length from the previous test.  I did this a couple of more times just to be sure and it was always the same.  The test procedure was very repeatable.  The end result was that I did not have front wheel alignment set optimally.  After a few more trials I narrowed the setting down to two possibilities.  While they were close I always rolled further with the one setting by more than the margin of error.  The real question is whether this effort was worth it.  I very much suspect so just from the fact your tires won't wear out as quickly if the setting was off.  Even just using the difference in distance rolled this would amount to at least 10 meters per km.  It is most likely considerably more when you apply effort or coast down hills(go faster).  Certainly enough to be noted by a riding buddy if they are slower than you or you are having trouble keeping up. A small improvement in the test procedure would be a better way of measuring the start position.  I will try a round tube taped of the side of the velo which I sight down to a line on the road.  This should get the start point to within a cm or less. 

Monday, August 5, 2013

First Longer Ride

Last weekend I had the chance to go for a longer ride on the much flatter Vancouver Island.  A friend was visiting and I rode down to Courtenay with him. 

The day before, I had spent some time trying to improve the alignment of the front wheels.  I did a bunch of roll down tests using my Garmin to measure the speed.  I picked a hill with a flat run out which then goes slightly uphill.  The other criteria for the test was that I could turn around without getting out.  Top speed before slowing down was around 32 kph.  The results were quite variable for two reasons.  A bike computer would most likely do a better job of measuring max speed.  The road surface was quite rough with a couple of dips/bumps which changed my speed.  While I got close to the same results on trials at the same toe in, they weren't good enough to convince me it was reliable.  I ended up setting just a tiny bit more toe in than before.  I will need to come up with a better site to do the tests.  Maybe I'll just try a roll out test measuring how far you roll out before stopping.  This is in keeping with the KISS (keep it simple stupid) principle . 

Back to the ride.  Dave, riding the bamboo bike he built, was a bit faster than I was uphill.  He was also towing a BOB trailer.  I suspect he is in much better riding shape than I.  I haven't ridden much lately but plan on changing that.  Once or twice, on very slight  up grades or the flats I was quicker.  Downhill was marvelous.  I will now have a new rule:  once over 40 kph just coast and enjoy the ride.  This is unless you are trying to catch someone or drop them.   The first interesting thing that happened is I got passed moving to the main traffic lane from the shoulder.  This is the second time this has happened in the same place.  There is a down hill where I pull into the main traffic lane from the shoulder once I am at speed of traffic.  There is normally debris on the shoulder at the bottom of the hill.  The hill has a left turn lane on it so it is at least three lanes wide.  This is the second time I have been passed here and both times I was 5 kph over the speed limit.  It seems cars just need to get by if you are travelling at or close to their speed.  I have noticed this before.  From now on I will be more careful when travelling at about traffic speed.  After the hill I just coasted to a stop until Dave caught up.  It seemed that it just coasted forever as I must have gone at least a km before coming to a stop.  I guess my small adjustment of the toe in was an improvement.  Part way to Courtenay there is a Pitch and Putt Golf course that serves ice cream and milkshakes.  The chocolate/raspberry ice cream makes a great shake especially with chocolate milk.   A little further along I noticed a small sign for Coastal Black winery that had an even smaller sign indicating that they have a Bistro.  Had I been driving a car I might have missed this.  There was another sign for a winery closer to Courtenay--places to visit on future rides.  Just a few km before I turned back, the road flattened out and was slightly downhill.  I just seemed to fly along here just pedaling lightly.  On the way back I did stop at Coastal Black Winery.  Sampled some Mead and had a pizza made in their wood fired oven on the patio--worth the stop.  Rode back to the ferry and then home.  Total for the day:  a bit over 110 km. 

The next trip to the store and back was quick.  Shaved a minute off without really trying.  So the toe in adjustment was positive.  It helps it you also inflate the tires.  On the longer ride they could have had a bit of air added.  It would have been an even quicker ride and I would have had longer rest times waiting for Dave to catch up.  I am now more convinced than ever that a velomobile makes a ideal touring machine.

Friday, May 31, 2013

No Fiberglass Milans only higher tech fabrics(maybe)

This is a define possiblity.  I am evalulating some new materials that could displace glass in the Milan.  The primary advantage will be its lower density(lighter parts) and secondarily that it can be made in a very sustainable manner.  The material is derived from wood waste in Western Canada.  To make it even a little more interested it was developed locally.  Previous greener fibers for composites have had much lower perfomance than glass at substainally higher cost.  The new cellusoe derived material is priced better and has perfomance much like glass.  In the photo you can see a set of samples laminated up.  The near one is about the present laminate in the Milan GT while the back one is the new material and some new material combined with Kevlar. 
The problem with designing a laminate for velomobiles is the very flat shape from the wheel well area to the tail.  The laminate needs to be stiff enough not to vibrate but it can't be very heavy.   One can add a reinforcing rib inside or modify the shape to make it stiffer.  Both are not optimal solutions if looking for the best aerodyaminc shape and least weight.  At first glance a cored laminate might be the solution.  Unfortunatley by the time you add the core you have the weight of three layers of fabric.  A core like this with very light skins on either side is very likely to print through the skin.  You will see in quite readily on the outside of the shell especially after a few years.   The strip of Kevlar in the near laminate was my solution to the stiffness/weight issue decribed above.   The bit of Kevlar in the far laminate should add some stiffness and increase the impact resistance of the velo. 

Saturday, May 18, 2013

Two of Three

Two of the three moulds for the shell of the Milan SL are now made.  Just one to go.  Once it is laid up I will let the moulds sit together and cure for an week or two.  There are lots of other moulds to be made.  A partial list is left and right wheel wells, rear fender mould in two version one for suspension and one  without, the front storage tray left and right, door, and covers for the chainline.  In addition new ribs for the floor will have to be designed and moulded.  At least I now know what is required from the experience building them for the Milan GT. 

Saturday, May 11, 2013

Milan SL Progress

Have made some progress on building the moulds for the Milan SL.  The top mould is built and now started on fitting the flange to divide the bottom into two parts.  This is necessary so the parts can be removed from the mould. 
 
I am glueing the flange on with hot melt glue so there is no need to make holes in the pattern. Makes moulding the other half easier.  

Sunday, April 28, 2013

Milan GT almost completely done

Added the electrical panel a couple of days back.  Here is what it looks like.  It is just in front on my shoulder and very easy to reach with my right hand.  Nicely tucked out of the way  There is still space of the left wheel well to use for some other purpose. 
 
The turn signal switch is in the top of each steering lever.  Using the toggle switch there is very convenient location and I can still rest my hands on on top of the levers without triggering the signals.  The first switch is power on/off the next two control the headlights and the last one with the two LEDs above it is the running lights and turn signals.  To prolong battery life I can turn parts of the system off.  Turning on left and right signal lights is like having hazard lights. 

 
Just behind the seat on the bar supporting the rear fender is the battery.  Before I had the battery sitting on the floor but this is a better location.  The battery comes in a small pouch with a Velcro strap that makes hanging it here easy.  There would be room on the bar for at least three other battery packs.

 
This Milan does not have all lights the production version will have.  The rear light and brake light will normally be added into the back edge of velo below the rear handle.  The problem with adding them to this one is that I can't get inside to bond them in place without cutting a large hole in the bottom of the shell.  It is impossible to reach the back edge once the shell is assembled and the rear fender is in place.  They will have to be added before the top is bonded to the bottom.   The only other bits missing are the covers that go over the chain under and behind the seat.  Moulds for these are made but they need sanding and polishing.  

Saturday, April 27, 2013

Milan SL Flange

Just about ready to put the parting flange on the Milan SL pattern.  The nose reminds me of the high speed trains in Europe or Japan. 

I mounted the pattern on a rolling cart and then built up supports to hold the flange.  When I had the flange off to coat it with shellac you could really see how relatively skinny the SL is. 


Its a bit hard to tell with out one to contrast it too but you can see how little it is wider than your shoulders at the widest point.  The little swiggle about 2/3 way back is the small bump out for the shoulders.  It is wider at the front wheels as the shell tapers in towards the parting line so the wheels can be completely enclosed.  If they weren't enclosed it could be another bit narrower there too. 

Monday, April 15, 2013

Reflective Stripe and Wind Damage

The first attempt at the reflective stripe came out quite nicely.  It does need a little modification but that is really minor.  I made up a pattern by taping plastic to the velo and drawing the shape of the strip on it.  Then measured coordinates of the  line so I could put it into my CAD program.  Took that file and transferred it into a file that the local sign shop could use to made the decal. Still have the Milan GT and velomobiles.ca decals to make and apply.  One more step closer to production.  
 
Reflective strip photo with flash.

Reflective strip without flash.
 
 
Wind Damage otherwise know as operator error.
This happened a couple of month ago.  The Milan was standing outside of the shop on a windy day.  It had been there for a couple on months with no problems.  I had thought of turning it to face into the wind as I walked by heading in to the house for lunch.  It was fairly windy with some good gusts.  The velo was sitting at about 30-40 degrees off the wind with the back end facing the wind.  Anyway  when I came out after lunch the door and hood were bend over the front of the velo bobbing in the wind looking like they were about to be ripped off.  I ran over and closed the door and then turned the velo to face into the wind.  I was a bit pissed off and didn't even look at the damage until much later.  A couple of beers that night helped.  What must have happened was that a gust got under the back edge of the hood as pressure built inside the velo from air going in the foot hole.   The gust must have been perfectly timed to lift to door.   We did have gusts up around 80 kph at the time.  When I took a proper look at the damage I was impressed on how well it stayed together.  There was no damaged at the hinge point that looks quite vulnerable just some cracking of the gel coat and some separation of the laminate at the crack.  The glass laminate has a polyester woven around the glass fibers.  It makes the laminate more damage tolerant.  I may just fix the door rather than make a new one as it makes for a good story.   I was originally going to replace the door as I wasn't quite satisfied on how the join line for the undercut came out.  Normally when riding you latch the door closed.

Monday, April 8, 2013

Last four moulds for Milan GT

The last four patterns almost ready for the moulds to be made from them.  The one on the left is the control panel which will have on/off, running lights/turn signals, one headlight and the other headlight switch with indicator LEDs mounted in it.  It will also have the control module and buzzer for the signal lights mounted in it.  It mounts just in front of my left shoulder high up on the shell.  This position minimizes the length of the wire runs.   The two in the middle are the chain covers that fit under the seat.  The right one is the right side storage compartment in front of the wheel well.   All the moulds have wide flange on them so I can bag or infuse them.  A couple of the parts would be a real struggle to do in a hand layup but that is mostly due to my impatience with hand laminating. 

The Milan SL patterns are now in my shop.  Once I have finished building these moulds for the GT we will be starting on building the moulds for the SL.  It does look quicker sitting next to the GT.  It is lower and thinner.  I can hardly wait to try it out.  The only problem may be that I may just be a little too tall for it.  I did manage to sit in the pattern so I now know that I have enough shoulder room but couldn't tell if my feet will fit.  It will be close thing in any case. 


Wednesday, March 13, 2013

Rear Lights


The rear light installed in the little fairing stuck on the Milan shell.  You can sort of see the front signal/running light in the nose to the mirror fairing.  The reason for not having a  picture of it is that it is still a work in progress.  I have not got it quite right yet but the third try should see it sorted.  At first I was a bit worried that the front running light would interfer with night vision but it does not. 
Here you can see the little fairing more clearly.

Thursday, February 21, 2013

LED Signal and Brake Lights

I now have the new version of the LED lights here to try out.  They are similar to our old ones which were no longer available.  My supplier did eventually find someone that could make them up provided I bought enough.  Luckily the minimum number is quite low so I could get some to try out.  The previous lights were mounted of the 20 mm aluminium disk that acts as the heat sink.  The new ones are now mounted on aluminium strips so they are lots easier to install. 
The longer skinny one is to fit in the back of the Milan.  The trailing edge of the Milan is not very wide so they are only .3" wide.  I will cut a hole in the trailing edge and then bond in a clear casting resin block with the LED strip attached to the back of with air space so the heat sink function of the aluminium strip still works.  I will then round the block to match the shape of the velomobile.  Some sanding with fine grits and polishing will finish the job.   I thought of just casting the lights into a block but they get a bit too hot for that.  The LEDs in the long narrow strip are red and the other are amber.  They are each 2 watt LEDs so each light will be 6 watts. 
 
Here you can see the lights in comparison to the tail lights of a Honda CRV.  The camera makes the LED in the middle look a bit less bright than it really is.  When I picked up the lights off the back of the spare tire I touched the aluminium strip and got a small burn for my trouble.  So they get plenty warm. 
 
Not quite as bright as the brake lights but still much better than a 1W LED.  


Monday, February 4, 2013

Borealis Stiffener

I have started on building a rib to stiffen the front top section of the Borealis.  This has come about as a result of the  how well ribs I made for the Milan worked out.    Right now the front top section of the Borealis is stiffened by the lip at the back end of the section.  I put a fair bit of material in the lip to make it stiffer but with the rib I can reduce this some.  This reduction should almost account for the weight of the rib.   The only real negative I can see so far is the extra work involve in making and installing the rib.   Hopefully there will be more orders for the Borealis to justify making incremental improvements.  Here is the picture of the beginnings of the rib.

Rather than pulling the part out of the mould I just built the rib on top of the bag film.  I will pop it loose from the nylon film on top of the part after it has cured for a couple more days.  Then just more sanding and a mould can be built. 

Saturday, January 12, 2013

Two Oops!!

I made a change to the floor of the Borealis V3.  My V3 has an occasional squeak I haven't been able to track down.  Brock thinks he found the source so I ended up adding some more clearance around the frame.  The Sprint has a couple of welded on bits to better manage the cable housings that weren't on previous models.  There is some clearance now but it is not a lot.  Below you can see the cut outs in the mould with chunks of the modified plug in place. I will gel coat the areas then laminate some material over the gel coat.  Once that is hard remove the plugs, sand and then polish. The sanding is a bit tedious but lots less work than building a whole new mould.
The other oops has to do with the rain gutter in the Milan.  I made the second side which was a bit different in shape to the first side.  I ended up liking the second shape better so I am now changing the first one.  Same process as above but a lot smaller mould.

The beige coloured material in the cut out is the change in the shape.  I straightened out the shape so it more closely matches the shape of the hatch opening.  Not a lot of change but right and left sides were different enough to bug me.  
 
The Milan has been sitting outside in the rain for a few days and the rain gutters work as planned.  I did end up adding some drain holes in the floor so any other water that gets in can drain away.

Tuesday, January 1, 2013

Glueing the Rain Gutter In

The gutter being glued in.  I had to make some special blocks to clamp it in place.  Just barely had enough spring clamps to do the job. I will most likely have to get more so I can glue both sides in at once.  The adhesive I use takes a few hours to set.   Here's what it looks like once the clamps are removed and the drain tube installed.

Closeup of the drain tube.  A bit of silicone seals it to the gutter and holds it in place on the side of the shell.  I shape the top of the tube with heat to fit the inside of the gutter and prevent it from pulling out of the gutter.