Ended up riding 45 km yesterday. Mostly doing a couple of errands and going for dinner at a friends. None of the rides were very long but I got cold feet anyway. I had thought that it wasn't quite cold enough to put the over boots on so the first couple of trips were OK as my feet only got a bit chilled. I had a lightweight toque on under my helmet and was happy and warm at -5C. On the last ride home at night in must have been a bit cooler as half way home I put the over boots and some lightweight gloves on. My hands warmed up quite nicely but the over boots just only slowed the cooling of my feet. I ride in road shoes with a thin foam insole I added to block up the vent hole in the bottom of the shoe. This amount of foam isn't enough so I will be adding as much thickness as I can. I have some 5mm foam that I will try to fit in the shoes. If this doesn't work I can always resort to riding in warmer shoes and not clip in.
Managed to end up riding 6,000 km in the velomobile this year. This is a considerably lower number than what I had thought I would end up at for the year. At the beginning of August it looked like I would end with about 10,000 but that never happened.
Friday, December 31, 2010
Tuesday, December 28, 2010
Rear Derailleur Sheild
This is still a bit of a work in progress but it is now 90% done. Just another modification and I will be happy with it.

The numbers on the part should help in adding the little flange to the part so the cover sticks out over the chain mid way along the swing arm. The chain is pretty much covered by the swing arm here anyway but adding the flange will make it a bit more so. Once this is done the only bit of the chain exposed will be from the lower jockey wheel to the chain tube. I am still thinking about how to cover this but its a bit difficult to do if you leave the rear wheel well open at the bottom so its easy to change the rear wheel. If we were using a 26" rear wheel the derailleur would be much higher off the ground and this would be simplier to do.
Sunday, December 26, 2010
The New Steering Arm
We have been working of the new steering arm for the Borealis for a while. It will allow us to implement the central steering using the existing bearings on the trike. The way we had done this previously was to use much smaller bearings and a sleeve that clamped around them which also stuck up far enough so the mast pivot could also be fastened. Here is a picture of the first batch being made. The mast pivot and the steering arm are now one part. A much more elegant solution.

Along with the steering arm we have developed a carbon fiber mast and handlebar. The first one should be assembled in a couple of days. Once its together I'll post a couple of pictures.
Monday, December 20, 2010
Heat Forming Foam
Did some more experimenting on closing off the wheel wells. At first I tried just using a flat sheet of foam, bending it, making slots for the handle bar and tie rod to go through and holding it in place with Velcro. The slots for the tie rod and handle bar are smaller in area than the holes normally found in velomobiles for the tie rods to pass through. Should be quite effective in keeping the water out. While this worked well it didn't look much better than the cloth covers we have been using. I ended up with a pucker in the back corner under the shifter. So I tried heating the foam and holding it in the wheel well of the Sprint plug. This got rid of the pucker and shows lots of promise as a good solution. The foam shaped quite easily but you would need matched moulds to do it properly. Luckily the shape is fairly simple so it might be possible to do this. Some fabric glued to the foam would spruce up its appearance. These covers would be similar to the cockpit covers on the Quest and Mango velomobiles. The next step will be to make a mould to help shape the foam.
Saturday, December 18, 2010
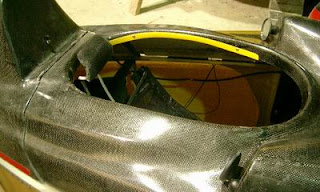
Riding in the Rain
Rode home in the dark today while it was raining. It was a very pleasant time all things considered. It wasn't raining very hard and I arrived at home without any water spots on my glasses . I have been experimenting with the size of the wheel well opening to allow clearance for the handlebar and your hand with the original under the seat steering setup. I bolted in a part off the mould that closed this area in completely and then slowly removed material until I have the minimum sized opening. The reduction in the opening is about 50%. I closed off part the the remaining area with some thin foam that flexes out of the way when your hand or the handlebar intrudes on it. I also removed the fender as with a good cover over the remaining opening it should not longer be necessary. Not having completely closed off the remaining area some spray still made it inside but about half way home the potential solution suddenly presented itself. I had been thinking of a cloth cover but that looked like it would be complex to make the pattern for. It would need some stiffeners or battens added to the fabric to keep it from getting too close to the wheel. An overly complex solution to a simple problem. I will try the new idea out with some scrap foam we get when we order foam blanks for our kayak seats. The scrap is the skins cut off the foam buns to get it to the thickness we use. It is sent along with the foam to protect but I suspect it is mostly packed with it so the supplier doesn't have the throw it out. We use it to pack our kayaks for shipment. Now it has a new use.
Wednesday, December 15, 2010
Flevobike roof vs My roof
Here's a picture I have been meaning to take for a while. It is the Flevobike roof sitting on top of my roof for comparison purposes.

If you look closely you can see the attachments points bolted onto my velo for the Flevobike roof. So as a true comparison the Flevobike roof should move forward couple of cm. Until I put the Flevobike roof on top of mine I didn't quite realise how much longer mine was. The big advantage of the Flevobike roof is that you can take it apart an stow it inside the velomobile. Mine is more effective in keeping the rain out but you either have it on or its at home.
It is the rainy season here now and I have my roof on almost all the time. I much prefer riding without it as you are more connected with what's around you. With it on it feels more car like. The advantage of either roof is that with it on you are more anonymous. Sometimes you just do not want the attention you get and the roof helps with that.
Friday, December 10, 2010
Steering Arm
To implement the central steering we are making up a new steering arm. I am having it CNC machined to fit on the existing bearings the Sprint come with. It is taking some time to get it right. Here is a picture of the first prototype partially machined. The roughing cut on the second side has been done.


Thursday, December 9, 2010
New for Door for the Sprint

Have decided to add a small bump to the door so taller riders have more knee space. I would just fit without the modification as its the same height as the Borealis V2. I am 188 cm tall and have just 2-3mm clearance so added the bump will give me 10 mm or so. Its not really fair calling it a bump as its the same height as the bumps running to the mirrors. It does not change your vision to the side and still lets you see the road directly in front quite well. One disadvantage of this change is that I will need to make a new mould for the wind deflector. In the picture you can see one side has been done and I am now ready to start on the opposite side. The first side is always quicker unless you have a hard time deciding on the shape. Most of the work is in making the other side very similar to the first. You can see a couple of lines drawn on the shape to help me in placing my profile gauge when comparing the sides. The other way we can make the model is to create it in the computer and then mirror it to get the second side. You then have the model cut in foam on a CNC machine. I have done this for some of my kayaks but the temptation to changes things a bit once you have the full size 3D model in front of you is sometimes great. At least in this case yo are starting with two sides that are identical.
We have now built four of the five major moulds required for the new model. The door is the last major mould. It should be done next week if all goes well. There are some other small moulds still needed but those can't be made until we have parts out of the ones we are working on now.
Friday, December 3, 2010
More on Borealis for Sprint
The back top section mould about half done

The plug now only needs two more layers of mat to finish the layup of the mould. Mat is randomly oriented glass fibers held together by a binder. It is available in various weights depending on how much of it you want to use per layer. We mostly use it for building moulds as there is no weave pattern to it that can print through to the mould surface. Its also the least expensive of the commonly available reinforcement materials. It builds thickness quickly but isn't very strong for its weight as it is at least 50% resin. The short glass fibers make it easy to get it to conform to shapes.
The next step is to build the top front mould. The pattern for the top front is almost ready for mould release. Once this mould is done I can use the patterns for the back and front top to build the pattern for the door.
One of the next posts will be about how my Borealis went on a diet and lost two and half pounds.
Wednesday, December 1, 2010
More on the New Door

We have just opened the bag and poured the resin in. We used about 1200 g of resin to make this part. We could get away using a bit less next time maybe 1000g. Of this amount not all ends up in the finished part as you need a bit extra to chase some air out of the part. There is also some soaked up by the peel ply which gets pulled off the part after its hard. The peel ply leaves a smooth surface and gets rid of bag lines. Bag lines are those folds or wrinkles in the bag from getting it to conform to the shape of the part. There also has to be extra to wet out past the trim edge of the part.

Here we are part way through wetting the part out. You can see the puddle of resin near the wetout line waiting for the vacuum to draw the resin into the dry fabric. We use a Teflon squeegee to manipulate the resin by working on top of the bag. The white plastic part in the bottom of the picture is the squeegee. It has helped make thousands of parts.

Friday, November 26, 2010
New Door for Steve
I have started to build a new door for my Borealis. The present door was an experiment using some new material that didn't quite work out as well as it should. The door ended up warping quite a bit. It doesn't close properly and is heavier than need be. Hence the new new light weight carbon/kevlar version coming up. First we gel the mould and once that is hard the material is added to the mould. In the picture below you can see the first layer of carbon stuck to the gelcoat with the carbon,glass and kevlar reinforcing added.

This next picture shows all the material in but the last layer of peel ply which is partially installed. The Kevlar has been stopped just short of the edges and replaced with some carbon. The reason is that it very difficult to sand an edge with Kevlar smooth. Kevlar sands very poorly leaving a fuzzy edge.

Here is the next picture in the process with the bag sealed and a vacuum check being done. The bag is not polyethylene as it doesn't work very well for this process. Polyethylene expands somewhat when the resin exotherms, which can cause some problems for the part. The last thing you want to happen before the part has hardened is for the part to expand due a loss in vacuum because of a leak or pump failure. What happens is the part expands and fills with air. In the worst case it gets a third thicker and is a rather expensive spong like thing to throw away. Polyethylene also allows styrene vapours through it so you still have to wear a respirator making the whole process more unpleasant. We use a nylon bag which adds a bit to the cost but makes for a much more reasonable work environment.

Thursday, November 25, 2010
The Other Half
Just about ready to make the second mould for the Borealis for the Sprint. The plug has a parting flange installed along the middle as we make the bottom half in two parts.

While it is possible to bag the bottom half with the two moulds bolted together it is more reliable to do it in two separate operations and then join the parts. The mould for the bottom half of this version of the Borealis is in two parts while the Borealis V2 is in three. The reason for three parts was to reduce the volume for shipping however it is taking me quite a while longer to make the extra part and join the parts together. This extra time more than offsets the saving in shipping in North America. Should we sell some to Europe I will have to look into how we can create a smaller package by building it in more parts.

While it is possible to bag the bottom half with the two moulds bolted together it is more reliable to do it in two separate operations and then join the parts. The mould for the bottom half of this version of the Borealis is in two parts while the Borealis V2 is in three. The reason for three parts was to reduce the volume for shipping however it is taking me quite a while longer to make the extra part and join the parts together. This extra time more than offsets the saving in shipping in North America. Should we sell some to Europe I will have to look into how we can create a smaller package by building it in more parts.
Monday, November 15, 2010
Version Two Borealis
Just about finished the first production Borealis version 2. Here is a picture:

What is remarkable about this one one is that it has a carbon nose and door. There is no gelcoat on these parts, for a bit of weight saving, and it looks good, too. This may well be the best looking Borealis yet.
I have been trying out a new flange around the opening in the door. I made up a mould for one side and now have it installed on my door. See photo below.


I have been trying out a new flange around the opening in the door. I made up a mould for one side and now have it installed on my door. See photo below.

I made it up in a constrasting colour so it would show up well. There is about a 2 cm wide flange that covers the bottom edge of the door opening so now when you bump into it, it is easy on the shoulder. Here is a picture of it from the underside.

Now we just have to do up the other side. I should have in done in a week or so.
Tuesday, November 9, 2010
Borealis for Sprint
Here's a picture of the progress on the plug for the Borealis that will fit the Sprint from ICE.


In the wheel well you can see how much the plug has been widened, 1" each side, to make it fit the Sprint. You can see the different colours of the fill used to build up the shape. I have been using left over gelcoat and resin with a filler. I mix up these leftover amounts with a very light weight filler to make a paste that I trowel on to the approximate shape. Once it hardens up I can sand this quite easily as its very soft. Its not tough enough and too porous to take a mould off so I have to encapsulate it in fiberglass and then use a harder filler and sanding gel to get to a moldable plug. You can see the fiberglass cloth hanging off the bottom edge of the plug. The reason for the cloth is to hold it all together as I have had the misforutne to have the soft filler pop off a plug when I dropped it. It has such a high filler loading that its bonding strength isn't too good.
The plug still has to have the recess for the rear wheel cover added but the basic shape is all there now.
Monday, November 1, 2010
New Rear Attachment Plates
We have finally machined up a set of the new rear attachment plates. These plates work to attach the QNT trike to the back of the shell. Here is a picture of them


Previously I used to laminate up similar parts out of quite a few layers of glass and carbon fiber. It ended up taking a fair bit of time and material cost was more than for the aluminium. While the composite parts are working well I can see that there may eventually be an issue of the softer composite part wearing on the aluminium part it attaches to. We now have a few in stock for future orders. Here is another picture of the installed.

The rear attachment plates for the Sprint NT are slightly different. I have started on the next order and once we a far enough along with it I will have some more pictures.
Sunday, October 31, 2010
Ride with another Borealis velomobile
Went for a ride today with a friend. He used our demo Borealis. We met up at the shop and then rode to breakfast. Had a very leisurely breakfast and then headed out for a longer ride. We did a fairly flat route out to Pitt Meadows and back to Albion. It is very unusual to be able to ride with another velomobile here as I mostly end up riding by myself even when riding with other cyclists. The velomobile just has a different speed profile than regular bikes so if I want to ride with others I have to go slowly on the flatter or downhill bits and work harder on the uphills so we are similar in speed. We explored a couple of spots I hadn't been to lately and they were passable with a velo. One spot if you were on a regular bike you would have had to stop and dismount while we were low enough to ride under the barrier. I ended up with 66 km for the day.

Here's a picture of a new seat in development.

I have had this seat around for a couple of years and been slowly making changes until I was happy with how it fit me. The original idea was to build my own highracer with an integrated seat and tailbox, but realising that I would never have time to do it, I ending up buying one instead. The seat differs from other composite seats that have two large ridges down the back for stiffness and are pretty flat crosswise on the front. I found that these seats never seemed to fit me well as I seem to need a groove in the middle of the front for my back. In the picture you can see the groove down the middle and a small stiffening flange all around the outside of the seat. The mould has wide flanges on it so we can either infuse it or use our proprietary bagging process. It may well be quite a while until I get to try the seat out. If it fits in the Borealis it could reduce the weight by a good part of a kilo and lower the COG a bit for better cornering. In Version 2 if I end up a bit lower the Flevobike roof will work better with my helment on. Right now I fit without touching but if I turn my head I just contact the roof with my helment.
Wednesday, October 27, 2010
A New Resin

A somewhat greener resin we are about to try out. It is partially made from plant-based materials. From the literature we would never use enough to make a big difference but every bit counts. Its available in a standard formulation and also one for infusion. We most likely wouldn't be using it for our kayaks as it is not recommended for use under the waterline without a barrier coat. The numbers from the spec sheets are quite good especially when compared to less expensive polyester resins.

A somewhat greener resin we are about to try out. It is partially made from plant-based materials. From the literature we would never use enough to make a big difference but every bit counts. Its available in a standard formulation and also one for infusion. We most likely wouldn't be using it for our kayaks as it is not recommended for use under the waterline without a barrier coat. The numbers from the spec sheets are quite good especially when compared to less expensive polyester resins.
Sunday, October 24, 2010
New Borealis for Sprint trike
I have started on the plug for the new, wider Borealis that will fit on the Sprint trike. Right now the Borealis only fits the Sprint NT(narrow track) or the older QNT trikes from ICE in Britain. After using the Borealis Version 2 a bit I have decided to incorporate most of the changes in the top to the new Borealis. The end result will look somwhat different from the present Borealis with a slightly shorter nose and longer tail. There may be some other changes too once I see it evolve a bit.

Here is a picture of the new door plug. I built it so it could be used to make a jig for trimming the door for Version 2 and then as part of the wider Borealis plug. I am fitting the first door for the first production Borealis Version 2 and need a jig to make trimming the next one more efficient. I am carefully fitting the door so it's taking a few hours but once its done correctly I can use the door to mark the jig. Once I have the jig setup right, trimming any future doors will be much quicker.

Here is a picture of the new door plug. I built it so it could be used to make a jig for trimming the door for Version 2 and then as part of the wider Borealis plug. I am fitting the first door for the first production Borealis Version 2 and need a jig to make trimming the next one more efficient. I am carefully fitting the door so it's taking a few hours but once its done correctly I can use the door to mark the jig. Once I have the jig setup right, trimming any future doors will be much quicker.
Tuesday, October 19, 2010
Flevobike Roof
Here are a couple of pictures of the Flevobike roof installed on the Borealis.


I don't use the velcro to hold the back end of the roof down, instead there is a lenght of shock cord and a hook to latch it around. I found that the velcro while it worked wasn't quite as good as the shock cord. In front of the roof you can see the wind deflector in place. Tthe lexan part can be removed and replaced with one that is taller if needed. I can just reach foward and detach the whole deflector if I am getting too hot or it starts raining. If I have a serious downhill coming up I will put in place to keep the wind out of my eyes. I find it is sometime difficult to see well at over 60kph even with my glasses on. A prescription set of biking glass would be ideal but this also works.


I don't use the velcro to hold the back end of the roof down, instead there is a lenght of shock cord and a hook to latch it around. I found that the velcro while it worked wasn't quite as good as the shock cord. In front of the roof you can see the wind deflector in place. Tthe lexan part can be removed and replaced with one that is taller if needed. I can just reach foward and detach the whole deflector if I am getting too hot or it starts raining. If I have a serious downhill coming up I will put in place to keep the wind out of my eyes. I find it is sometime difficult to see well at over 60kph even with my glasses on. A prescription set of biking glass would be ideal but this also works.
Tuesday, October 12, 2010
Welcome to our new blog about velomobiles

The biggest change is to the top which is now about 5 cm lower than before. While I still just fit, this will be much better for medium and smaller riders.
I built new parts to replace the original top on mine. The top is also a bit of an experiment as I used some Innegra and carbon fiber in the nose and the door to see if the parts could be lighter than using just Kevlar and carbon. The nose is just 16 grams lighter using 4 oz Innegra instead of 5 oz Kevlar and it is not quite as stiff. The door actually came out considerably heavier than my original door and has some problems with distortion. Not entirely sure what caused this but the low density of the Innegra and how it was oriented may be some of the explanation. I am not surprised that the door is heavier as it has almost twice the thickness of Innegra in it than the thickness of Kevlar in the original door.
 |
| Version One on the left, Version Two on the right |
Subscribe to:
Posts (Atom)