Monday, April 15, 2013

Reflective Stripe and Wind Damage

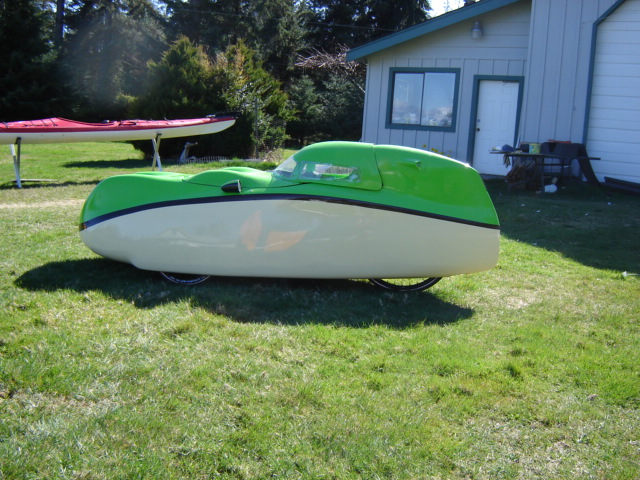
The first attempt at the reflective stripe came out quite nicely.  It does need a little modification but that is really minor.  I made up a pattern by taping plastic to the velo and drawing the shape of the strip on it.  Then measured coordinates of the  line so I could put it into my CAD program.  Took that file and transferred it into a file that the local sign shop could use to made the decal. Still have the Milan GT and velomobiles.ca decals to make and apply.  One more step closer to production.  
 
Reflective strip photo with flash.
Reflective strip without flash.
 
 
Wind Damage otherwise know as operator error.
This happened a couple of month ago.  The Milan was standing outside of the shop on a windy day.  It had been there for a couple on months with no problems.  I had thought of turning it to face into the wind as I walked by heading in to the house for lunch.  It was fairly windy with some good gusts.  The velo was sitting at about 30-40 degrees off the wind with the back end facing the wind.  Anyway  when I came out after lunch the door and hood were bend over the front of the velo bobbing in the wind looking like they were about to be ripped off.  I ran over and closed the door and then turned the velo to face into the wind.  I was a bit pissed off and didn't even look at the damage until much later.  A couple of beers that night helped.  What must have happened was that a gust got under the back edge of the hood as pressure built inside the velo from air going in the foot hole.   The gust must have been perfectly timed to lift to door.   We did have gusts up around 80 kph at the time.  When I took a proper look at the damage I was impressed on how well it stayed together.  There was no damaged at the hinge point that looks quite vulnerable just some cracking of the gel coat and some separation of the laminate at the crack.  The glass laminate has a polyester woven around the glass fibers.  It makes the laminate more damage tolerant.  I may just fix the door rather than make a new one as it makes for a good story.   I was originally going to replace the door as I wasn't quite satisfied on how the join line for the undercut came out.  Normally when riding you latch the door closed.

Monday, April 8, 2013

Last four moulds for Milan GT

The last four patterns almost ready for the moulds to be made from them.  The one on the left is the control panel which will have on/off, running lights/turn signals, one headlight and the other headlight switch with indicator LEDs mounted in it.  It will also have the control module and buzzer for the signal lights mounted in it.  It mounts just in front of my left shoulder high up on the shell.  This position minimizes the length of the wire runs.   The two in the middle are the chain covers that fit under the seat.  The right one is the right side storage compartment in front of the wheel well.   All the moulds have wide flange on them so I can bag or infuse them.  A couple of the parts would be a real struggle to do in a hand layup but that is mostly due to my impatience with hand laminating. 

The Milan SL patterns are now in my shop.  Once I have finished building these moulds for the GT we will be starting on building the moulds for the SL.  It does look quicker sitting next to the GT.  It is lower and thinner.  I can hardly wait to try it out.  The only problem may be that I may just be a little too tall for it.  I did manage to sit in the pattern so I now know that I have enough shoulder room but couldn't tell if my feet will fit.  It will be close thing in any case. 


Wednesday, March 13, 2013

Rear Lights


The rear light installed in the little fairing stuck on the Milan shell.  You can sort of see the front signal/running light in the nose to the mirror fairing.  The reason for not having a  picture of it is that it is still a work in progress.  I have not got it quite right yet but the third try should see it sorted.  At first I was a bit worried that the front running light would interfer with night vision but it does not. 
Here you can see the little fairing more clearly.

Thursday, February 21, 2013

LED Signal and Brake Lights

I now have the new version of the LED lights here to try out.  They are similar to our old ones which were no longer available.  My supplier did eventually find someone that could make them up provided I bought enough.  Luckily the minimum number is quite low so I could get some to try out.  The previous lights were mounted of the 20 mm aluminium disk that acts as the heat sink.  The new ones are now mounted on aluminium strips so they are lots easier to install. 
The longer skinny one is to fit in the back of the Milan.  The trailing edge of the Milan is not very wide so they are only .3" wide.  I will cut a hole in the trailing edge and then bond in a clear casting resin block with the LED strip attached to the back of with air space so the heat sink function of the aluminium strip still works.  I will then round the block to match the shape of the velomobile.  Some sanding with fine grits and polishing will finish the job.   I thought of just casting the lights into a block but they get a bit too hot for that.  The LEDs in the long narrow strip are red and the other are amber.  They are each 2 watt LEDs so each light will be 6 watts. 
 
Here you can see the lights in comparison to the tail lights of a Honda CRV.  The camera makes the LED in the middle look a bit less bright than it really is.  When I picked up the lights off the back of the spare tire I touched the aluminium strip and got a small burn for my trouble.  So they get plenty warm. 
 
Not quite as bright as the brake lights but still much better than a 1W LED.  


Monday, February 4, 2013

Borealis Stiffener

I have started on building a rib to stiffen the front top section of the Borealis.  This has come about as a result of the  how well ribs I made for the Milan worked out.    Right now the front top section of the Borealis is stiffened by the lip at the back end of the section.  I put a fair bit of material in the lip to make it stiffer but with the rib I can reduce this some.  This reduction should almost account for the weight of the rib.   The only real negative I can see so far is the extra work involve in making and installing the rib.   Hopefully there will be more orders for the Borealis to justify making incremental improvements.  Here is the picture of the beginnings of the rib.

Rather than pulling the part out of the mould I just built the rib on top of the bag film.  I will pop it loose from the nylon film on top of the part after it has cured for a couple more days.  Then just more sanding and a mould can be built. 

Saturday, January 12, 2013

Two Oops!!

I made a change to the floor of the Borealis V3.  My V3 has an occasional squeak I haven't been able to track down.  Brock thinks he found the source so I ended up adding some more clearance around the frame.  The Sprint has a couple of welded on bits to better manage the cable housings that weren't on previous models.  There is some clearance now but it is not a lot.  Below you can see the cut outs in the mould with chunks of the modified plug in place. I will gel coat the areas then laminate some material over the gel coat.  Once that is hard remove the plugs, sand and then polish. The sanding is a bit tedious but lots less work than building a whole new mould.
The other oops has to do with the rain gutter in the Milan.  I made the second side which was a bit different in shape to the first side.  I ended up liking the second shape better so I am now changing the first one.  Same process as above but a lot smaller mould.

The beige coloured material in the cut out is the change in the shape.  I straightened out the shape so it more closely matches the shape of the hatch opening.  Not a lot of change but right and left sides were different enough to bug me.  
 
The Milan has been sitting outside in the rain for a few days and the rain gutters work as planned.  I did end up adding some drain holes in the floor so any other water that gets in can drain away.

Tuesday, January 1, 2013

Glueing the Rain Gutter In

The gutter being glued in.  I had to make some special blocks to clamp it in place.  Just barely had enough spring clamps to do the job. I will most likely have to get more so I can glue both sides in at once.  The adhesive I use takes a few hours to set.   Here's what it looks like once the clamps are removed and the drain tube installed.

Closeup of the drain tube.  A bit of silicone seals it to the gutter and holds it in place on the side of the shell.  I shape the top of the tube with heat to fit the inside of the gutter and prevent it from pulling out of the gutter.